Text & Speech - Text to Speech and Speech to Text Converter Documentation
Welcome
Thank you for purchasing Text & Speech - Text to Speech and Speech to Text Converter Laravel Script. We covered almost everything in this document that how easily you can setup this script. We really do appreciate every sale. If you like our work please do not forget to rate it. It helps us in developing new and better cloud solutions.
Author: Berkine
Live Demo: Text & Speech - Text to Speech and Speech to Text Converter Demo
Video Demo: Text & Speech Usage Demostration (Youtube)
Video Demo
Watch video demostration of how to use the script and learn about its features
Requirements
Before installation, your server must have following requirements to run the script properly
PHP v8.1PHP Mbstring ExtensionPHP PDO ExtensionPHP JSON ExtensionPHP CURL ExtensionPHP shell_exec() CommandPHP symlink() CommandSupport for MySQL v5.xApache Server Recommended (nginx configuration and installation up to you, we don't provide support on that)
Installation Instructions
This is a general installation overview of the script, there is a deep dive section provided for each part in the left menu bar.
Follow the steps as explained, and you should be all set. If you face any challenges with installtion steps, reach out to us for a support.
Setup overview:
- Step 1: Unzip and upload only the contencts of textandspeech-1.0 to the root directory of your hosting server- Ex: /home/username/public_html or /var/www/html/. Which will make it reachable as follows: http://yourwebsitename/
- Step 2a: Warning! Some hosting platform hide files starting with '.' (hidden files), so make sure that in your settings of your cPanel you enable this option.
- Step 2b: Warning! If your local Windows/Linux/MaxOS environment does not show hidden files, and you are planning to upload the script via FTP, make sure you enable viewing hidden files locally first even before unzipping, otherwise you will not upload all hidden files such as .env/.htaccess to your FTS server simply because your local environment will not see them.
- Step 3: Everything inside of the public folder is accessible by anyone, so make sure you don't put anything sensitive there such as google json keys, etc.
- Step 4: After uploading all files and making sure that domain name has proper path set, create Mysql database and proper user in case if you don't already have one, to access this database. You can either create manually via your phpMyAdmin panel or use phpMyAdmin Wizard in your cPanel to create one.
- Step 5: Now you are ready to run the install script. Go to https://yourwebsitename/install or if you skipped Step 2, go to https://yourwebsitename/public/install.
- Step 6: This will start the installation process, click Start Intallation button.
- Step 7: Make sure required php packages are installed and enabled on your server. Click Next to continue.
- Step 8: Make sure listed folder are publicly accessbile. Click Next to continue.
- Step 9: For database configuration, enter your newly created database credentials. DB server: localhost, DB port: 3306.
- Step 10: On the final step enter your Envato License key for this product and also your Envato Username. In case if you don't know where to get your license, you can check this article.
- Step 11: If all goes well, you are now fully ready to start. The default login name is: admin@example.com and default password is: admin12345. You can change it after loggin in in your profile settings.
- Step 12: To start using Clout Text and Speech features, activate needed vendor(s) (AWS/Azure/GCP/IBM) and enter their respective api keys under Studio Management - Voiceover Studio Settings and Transcribe Studio Settings.
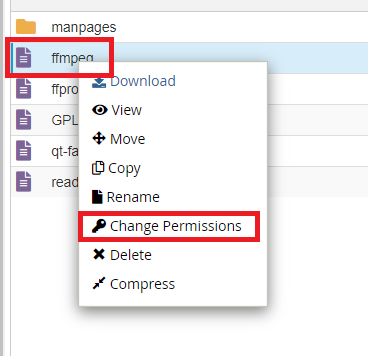
- Step 13: After installation is completed successfully, go to vendor/ffmpeg folder in the root directory of the script.
- Step 14: Change file permission of ffmpeg to be executable by anyone.

- Step 15: Important! Make sure that your hosting allows you to run shell_exec() command, it is required to generate multi voice synthesize tasks and for sound studio.
Database Setup in phpMyAdmin
To run admin panel properly and fetch the application useage data and to set the settings you will need to setup MySQL database 5.7.
How to create new Database in phpMyAdmin:
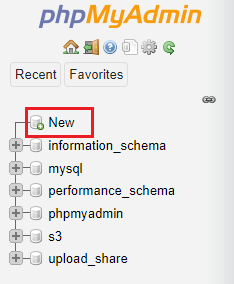
- Step 1: Login into phpMyAdmin.
- Step 2: Click on New button to create a new database.
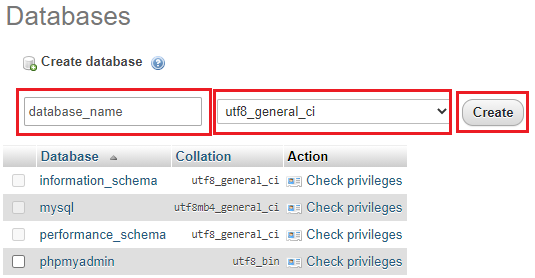
- Step 3: Provide database name and select utf8_general_ci as collation and click create button.
- Step 4: Make sure you have database user who can access this newly created database, if not you will need create one with all permissions and set a password
- Step 5: Also, to avoid any issues with database setup, make sure your newly created database has InnoDB set as storage type
- Step 6: Return to the Install process and enter your newly created database credentials. If using local server, you can set database host to localhost, and for mysql port use 3306
AWS Account Creation
Getting started with AWS. If you already have AWS Account, skip to next section.
How to Create AWS Account:
- Step 1: Open the Amazon Web Services home page.
- Step 2: Choose Create an AWS Account.
Note: If you signed in to AWS recently, choose Sign in to the Console. If Create a new AWS account isn't visible, first choose Sign in to a different account, and then choose Create a new AWS account. - Step 3: Enter your account information, and then choose Continue. Be sure that you enter your account information correctly, especially your email address. If you enter your email address incorrectly, you can't access your account.
- Step 4: Choose Personal or Professional.
Note: Personal accounts and professional accounts have the same features and functions. - Step 5: Enter your company or personal information.
Important: For professional AWS accounts, it's a best practice to enter the company phone number rather than a personal cell phone. Configuring a root account with an individual email address or a personal phone number can make your account insecure. - Step 6: Read and accept the AWS Customer Agreement.
Note: Be sure that you read and understand the terms of the AWS Customer Agreement. - Step 7: Choose Create Account and Continue.
- Step 8: On the Payment Information page, enter the information about your payment method, and then choose Verify and Add.
Note: If you want to use a different billing address for your AWS billing information, choose Use a new address before you choose Verify and Add
Important: You can't proceed with the sign-up process until you add a valid payment method. - Step 9: Verify your phone number. Enter a phone number where you can be reached in the next few minutes.
- Step 10: In a few moments, an automated system contacts you.
- Step 11: Enter the PIN you receive, and then choose Continue.
- Step 12: On the Select a Support Plan page, choose one of the available Support plans. For a description of the available Support plans and their benefits, see Compare AWS Support plans.
- Step 13: After you choose a Support plan, a confirmation page indicates that your account is being activated. Accounts are usually activated within a few minutes, but the process might take up to 24 hours.
- Step 14: You can sign in to your AWS account during this time. The AWS home page might display a Complete Sign Up button during this time, even if you've completed all the steps in the sign-up process.
- Step 14: When your account is fully activated, you receive a confirmation email. Check your email and spam folder for the confirmation email. After you receive this email, you have full access to all AWS services.
AWS IAM User Creation
You will need IAM user with programmatic access and with S3 Read & Write Policies attached.
Creating AWS IAM Users (via AWS Console):
- Step 1: Sign in to the AWS Management Console and open the IAM console at https://console.aws.amazon.com/iam/.
- Step 2: In the navigation pane, choose Users and then choose Add user.
- Step 3: Type the user name for the new user. This is the sign-in name for AWS.
Note: User names can be a combination of up to 64 letters, digits, and these characters: plus (+), equal (=), comma (,), period (.), at sign (@), and hyphen (-). Names must be unique within an account. - Step 4: Select the type of access this set of users will have. Select programmatic access.
- Step 5: Choose Next: Permissions.
- Step 6: On the Set permissions page, specify how you want to assign permissions to this set of new users. Choose Attach existing policies to user directly
- Step 7: Seach for AmazonS3FullAccess, AmazonPollyFullAccess, and AmazonTranscribeFullAccess select both afterwards select click Next: Review
Note: If you are familar with IAM Policies, you can create custom policy that will match your needs and security requirements. - Step 8: To view the users' access keys (access key IDs and secret access keys), choose
Show next to each password and access key that you want to see. To
save the access keys, choose Download .csv and then save the file to
a safe location.
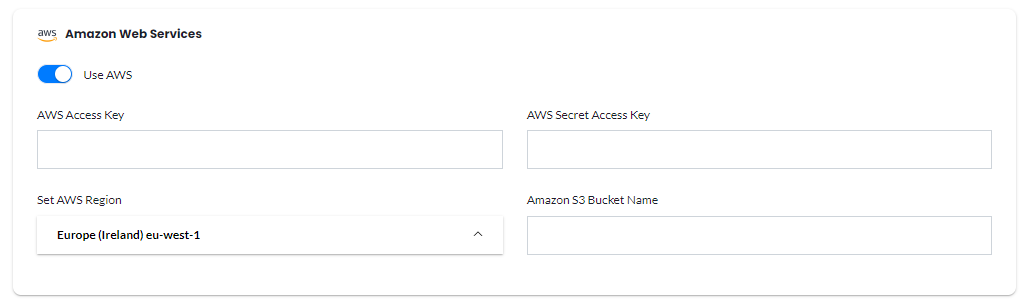
Important: This is your only opportunity to view or download the secret access keys, and you must provide this information to your users before they can use the AWS API. Save the user's new access key ID and secret access key in a safe and secure place. You will not have access to the secret keys again after this step. - Step 9: Include your Access Key and Secret Access Key to the AWS Credentials Settings tab in the admin panel as shown below.
Under Admin -> Studio Management -> Voiceover Studio Settings and Transcribe Studio Settings (in case if you are using Speech to Text feature of AWS) -> AWS, include your Access and Secret Access Keys:
Amazon S3 Bucket Creation
You will need an S3 Bucket with public read & write access in the region that you prefer.
A bucket is owned by the AWS account that created it. By default, you can create up to 100 buckets in each of your AWS accounts. If you need additional buckets, you can increase your account bucket limit to a maximum of 1,000 buckets by submitting a service limit increase. For information about how to increase your bucket limit, see AWS Service Limits
Create an S3 bucket:
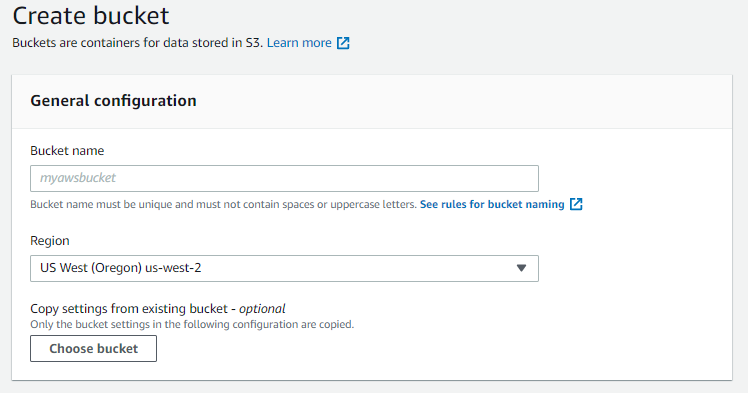
- Step 1: Sign in to the AWS Management Console and open the Amazon S3 console at https://console.aws.amazon.com/s3/.
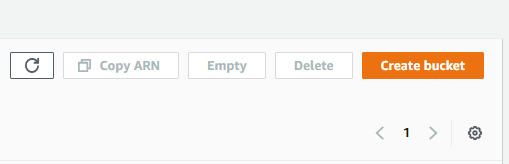
- Step 2: Choose Create bucket.
- Step 3: Enter Bucket Name and Select AWS Region where you would like to store your files and click Next. Note: Bucket name must be unique at a global level.
- Step 4: In the Set Permissions step, you need to turn off all 4 options if you want to make your S3 bucket completely public.
- Step 5: Review rest of the settings, or you can leave them as they are and click Create Bucket.
- Step 6: Include your Bucket Name and Select your AWS Region in the AWS Credentials Settings tab in the admin panel as shown below.
Under Admin -> Studio Management -> Voiceover Studio Settings and Transcribe Studio Settings (in case if you are using Speech to Text feature of AWS) -> AWS, include your S3 Bucket Name and select your AWS Region where bucket is hosted:
Amazon S3 Bucket Configuration
After successfully creating a bucket, add these addtional features for your S3 bucket.
Check these 4 steps:
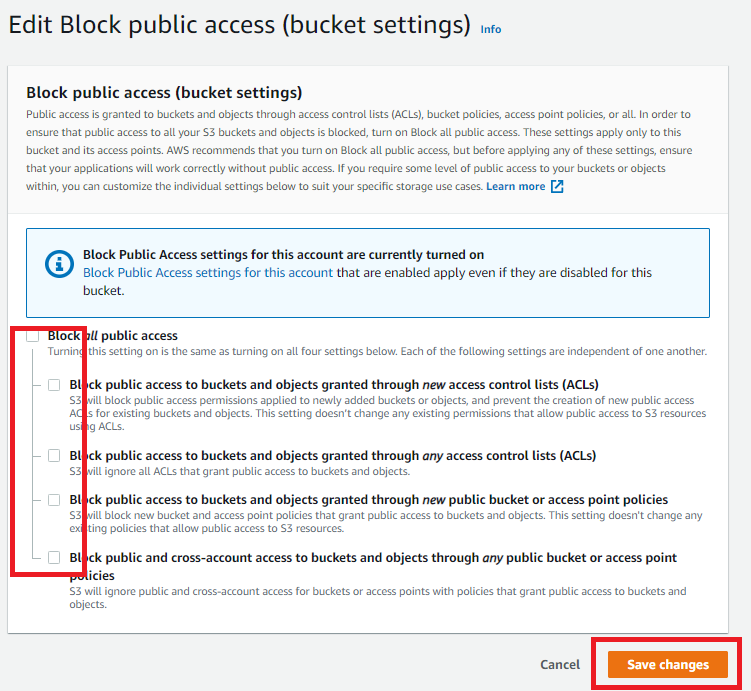
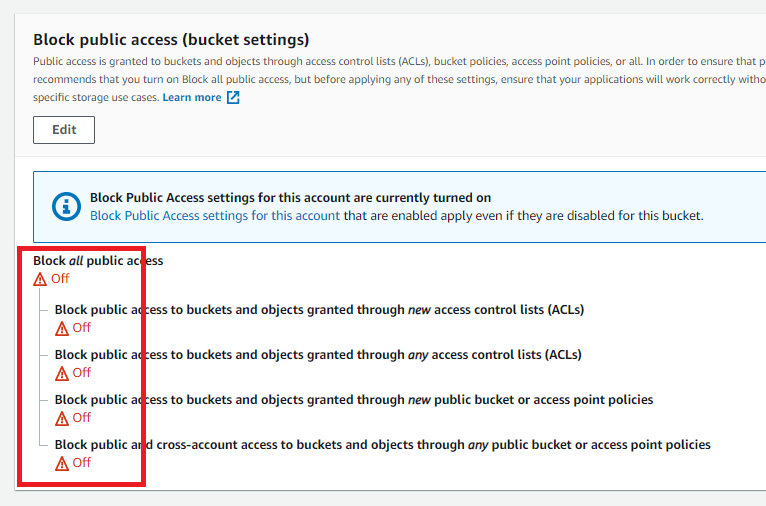
- Step 1: Make sure your Permissions -> Block Public Access looks at least like this and has all 4 options turned off.
- Step 2: Add CORS settings as shown below in the Permissions -> Cross-origin resource sharing (CORS) Configuration section and click Save.
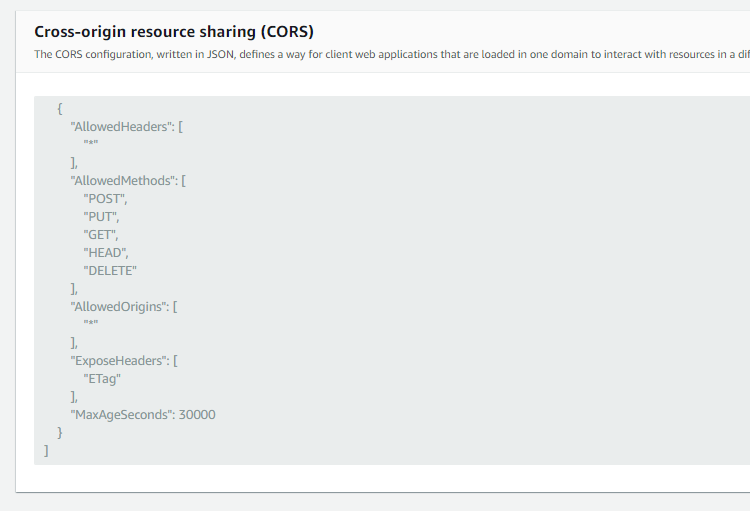
Copy paste these CORS settings to your bucket:
[ { "AllowedHeaders": [ "*" ], "AllowedMethods": [ "POST", "PUT", "GET", "HEAD", "DELETE" ], "AllowedOrigins": [ "*" ], "ExposeHeaders": [ "ETag" ], "MaxAgeSeconds": 30000 } ] - Step 3: Go to your newly created S3 Bucket click on Permissions -> Object Ownership and click Edit.

- Step 4: Select ACLs enabled and Object writer and click Save Changes.

Azure Account Creation
Getting started with Microsoft Azure.
IMPORTANT: Azure is retiring the standard voices on 31st August 2024 and they will no longer be supported after that date. Azure has announced this in emails sent to all existing Azure TTS users created before 31st August 2021. During the retiring period (31st August 2021 - 31st August 2024), existing Azure standard voice users can continue to use standard voices, but all new users/new speech resources can choose only neural voices. (Basically all standard voices will not work for all new Azure TTS users anymore, and available only for users who were using Azure standard voices before August)
How to Create Microsoft Azure Account:
- Step 1: Go to the Azure home page.
- Step 2: Create new account and afterwards sigin into your Azure Portal under your Profile on the top right corner.
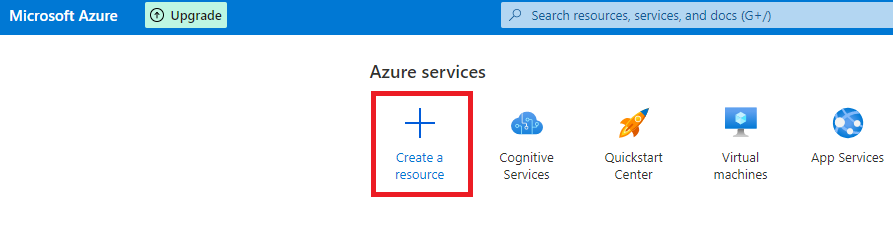
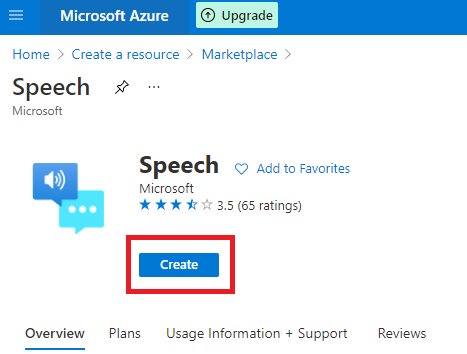
- Step 3: Click on Create a resource.
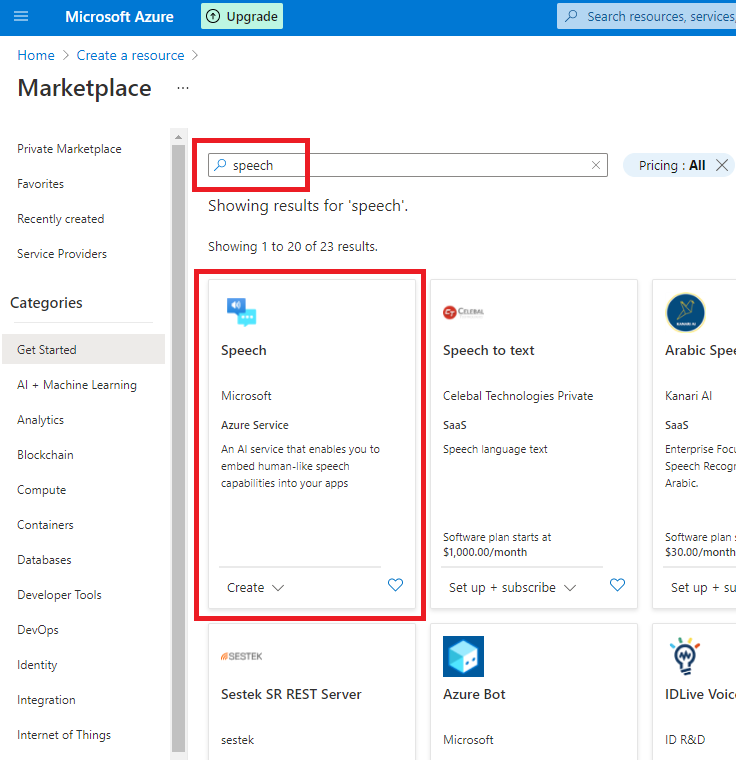
- Step 4: Search for keyword: speech and select the first Speech service from Azure.
- Step 5: Afterwards, click Create button.
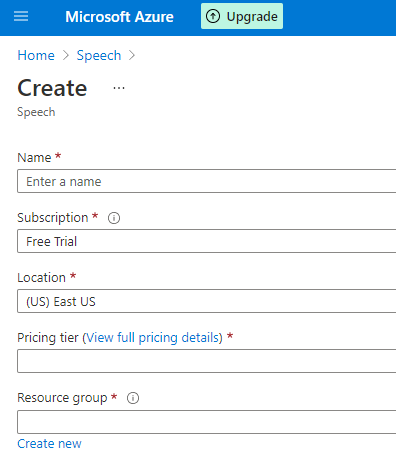
- Step 6: Fill in the required information.
- Name: Any string to identify this resource
- Subscription: Free Trial (default)
- Location: select Azure region as you prefer. Warning! Not every language/voice is available in all Azure regions, we strongly recommend to consider either US East or West Europe regions.
- Pricing Tier: Free F0 is good for starting only, it has limitation in concurrency, refer to Azure Documentations to get exact numbers. Standard S0 will start billing.
- Resrouce Group: Any string to group your resources.
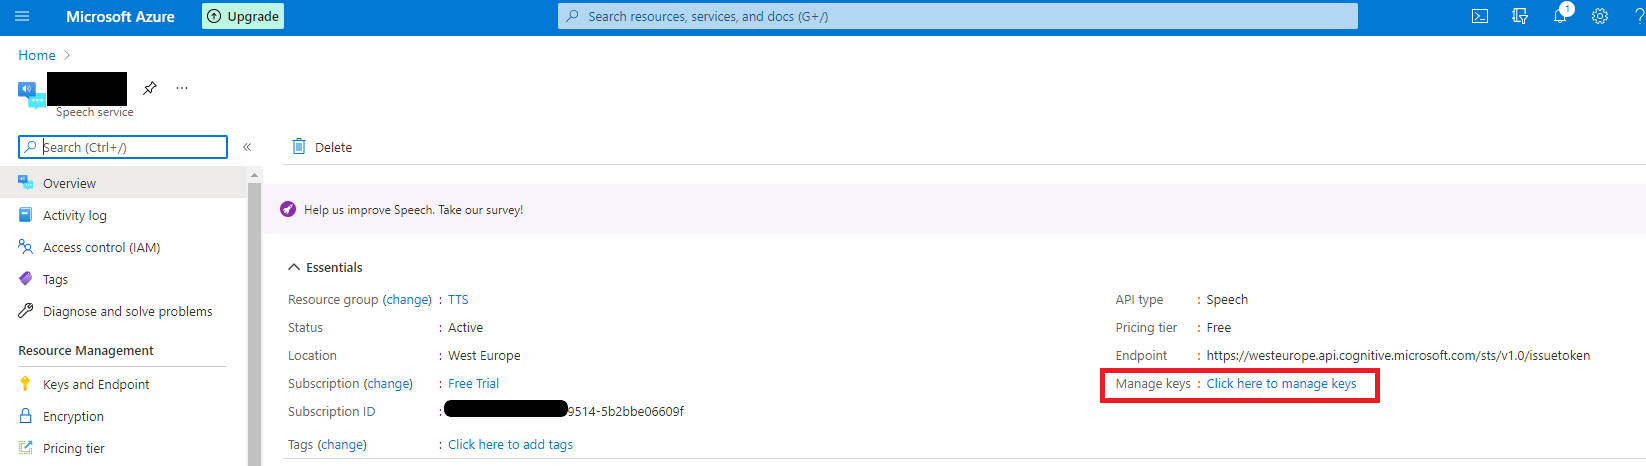
- Step 7: Almost there, on this the next page click on Click here to manage keys.
- Step 8: Copy one of the keys.
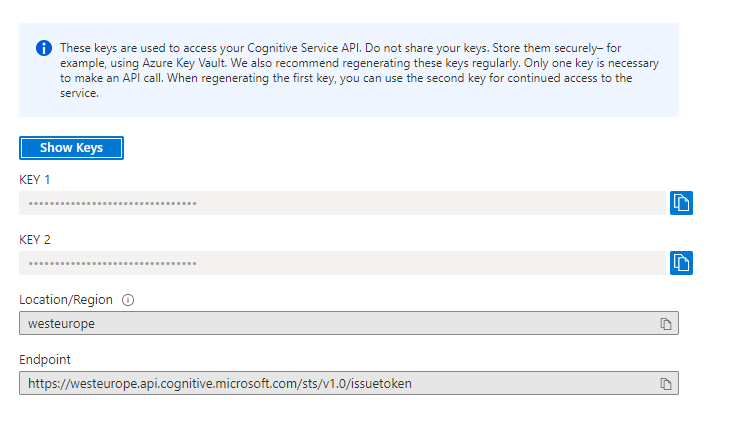
- Step 9: These keys are used to access your Azure TTS Service API. Do not share your keys. Store them securely– for example, using Azure Key Vault. We also recommend regenerating these keys regularly. Only one key is necessary to make an API call. When regenerating the first key, you can use the second key for continued access to the service.
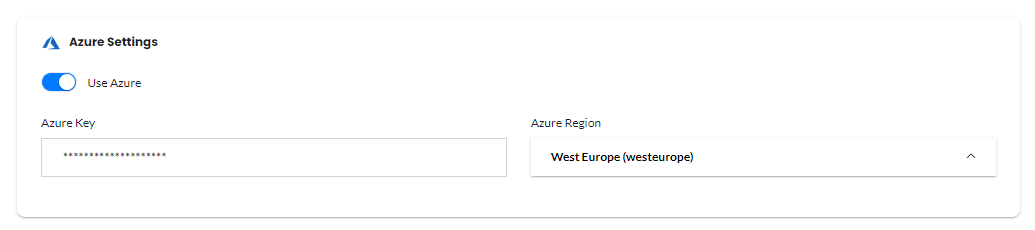
- Step 10: Go to Admin Panel, Studio Management -> Voiceover Studio Settings, and enter API Key for Azure, make sure you select proper Azure Region as shown in the previous step with your key.
- Name: Any string to identify this resource
- Subscription: Free Trial (default)
- Location: select Azure region as you prefer. Warning! Not every language/voice is available in all Azure regions, we strongly recommend to consider either US East or West Europe regions.
- Pricing Tier: Free F0 is good for starting only, it has limitation in concurrency, refer to Azure Documentations to get exact numbers. Standard S0 will start billing.
- Resrouce Group: Any string to group your resources.
GCP Account Creation
Getting started with Google Cloud.
Note: When you open a Google Cloud account, they provide you 300$ of credit that is valid for 2 months.
You have 3 options to setup below depending on what you want to activate. If you want to use both Text to Speech and Speech to Text feature of GCP, use the last setup instructions
ONLY GCP Text to Speech Setup
How to Configure GCP for Text to Speech only:
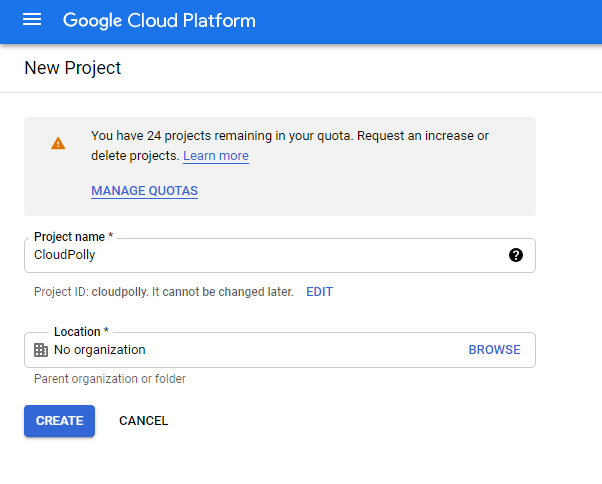
- Step 1: Go to the Google Cloud home page.
- Step 2: Click on the New Project button on the top left corner, and provide project name.
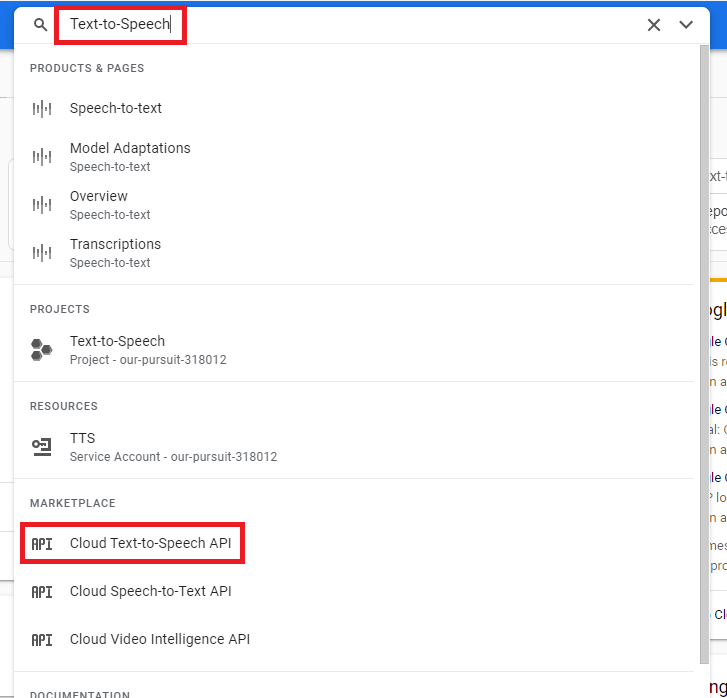
- Step 3: Afterwards search for Text to Speech keyword, and select Cloud Text to Speech API from the list.
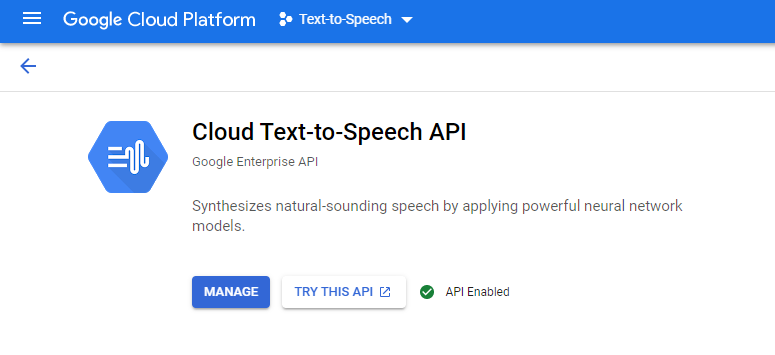
- Step 4: Enable Cloud Text to Speech API.
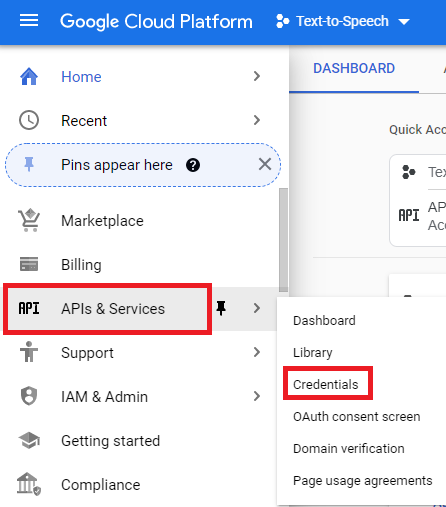
- Step 5: Go to API & Services -> Credentials.
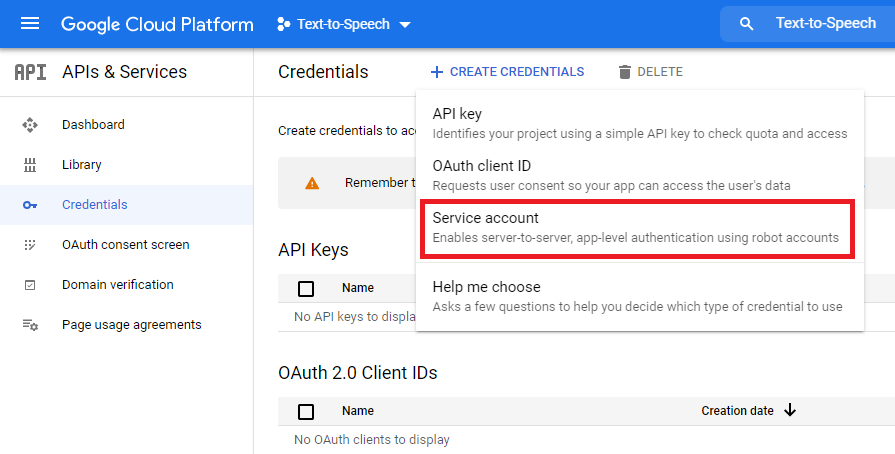
- Step 6: Click on + Create Credentials and select Service account from the list.
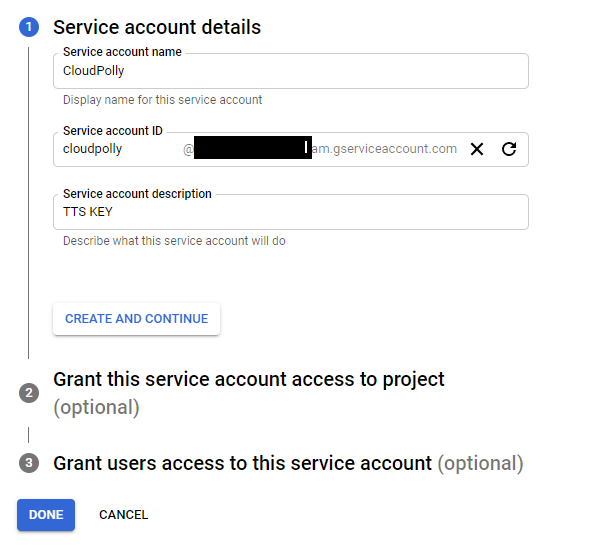
- Step 7: Provide Service account name and Service account description.
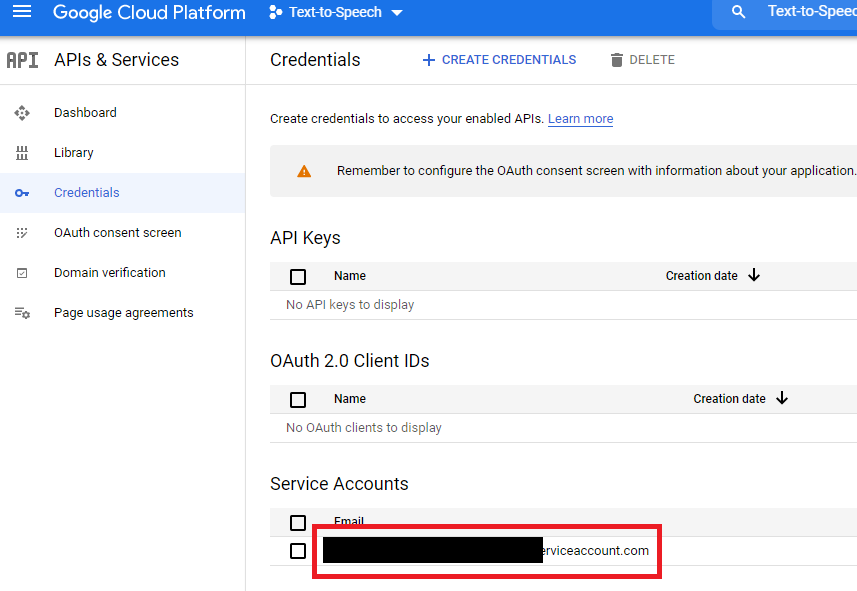
- Step 8: Click on your newly created Service account name.
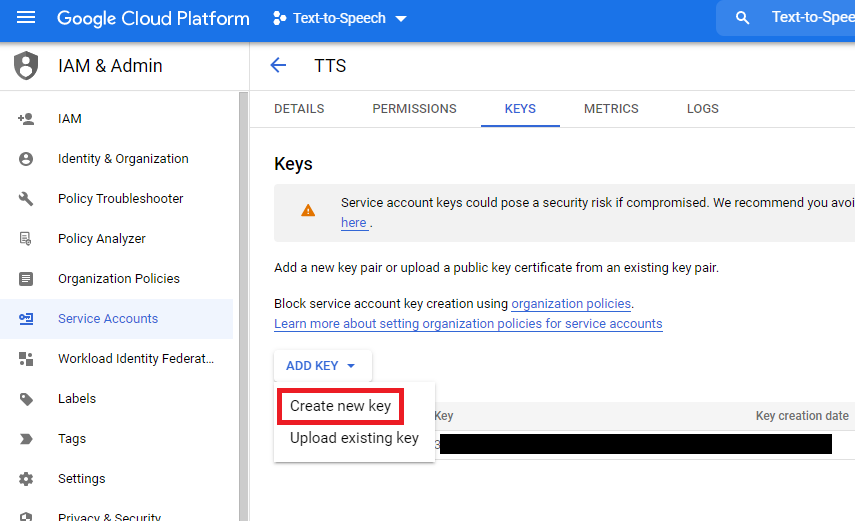
- Step 9: Under Keys tab, select Add Key -> Create new key.
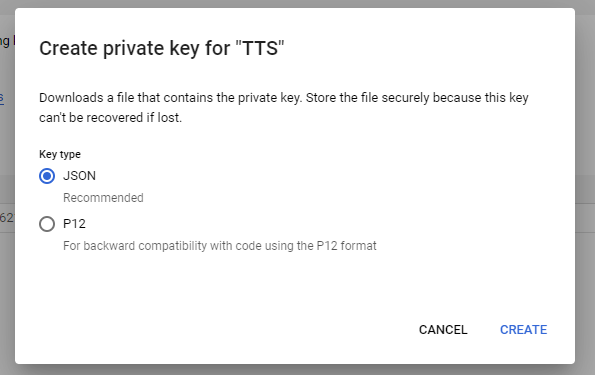
- Step 10: Select JSON as key type. Click Create, it will store in on your desktop.
- Step 11: Warning! Make sure you store this json file outside of your public folder, it must be stored in a secure place accessible only to you on your hosting server.
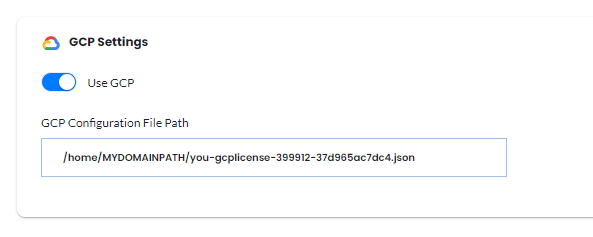
- Step 12: Include the path for the json in Admin Panel, under Voiceover Studio Settings. JSON file must be stored outside of your Public folder. Show full path for the JSON file including JSON filename. Here is an example for cPanel:
ONLY GCP Speech to Text Setup
How to Configure GCP for Speech to Text only:
- Step 1: Go to the Google Cloud home page.
- Step 2: Click on the New Project button on the top left corner, and provide project name.
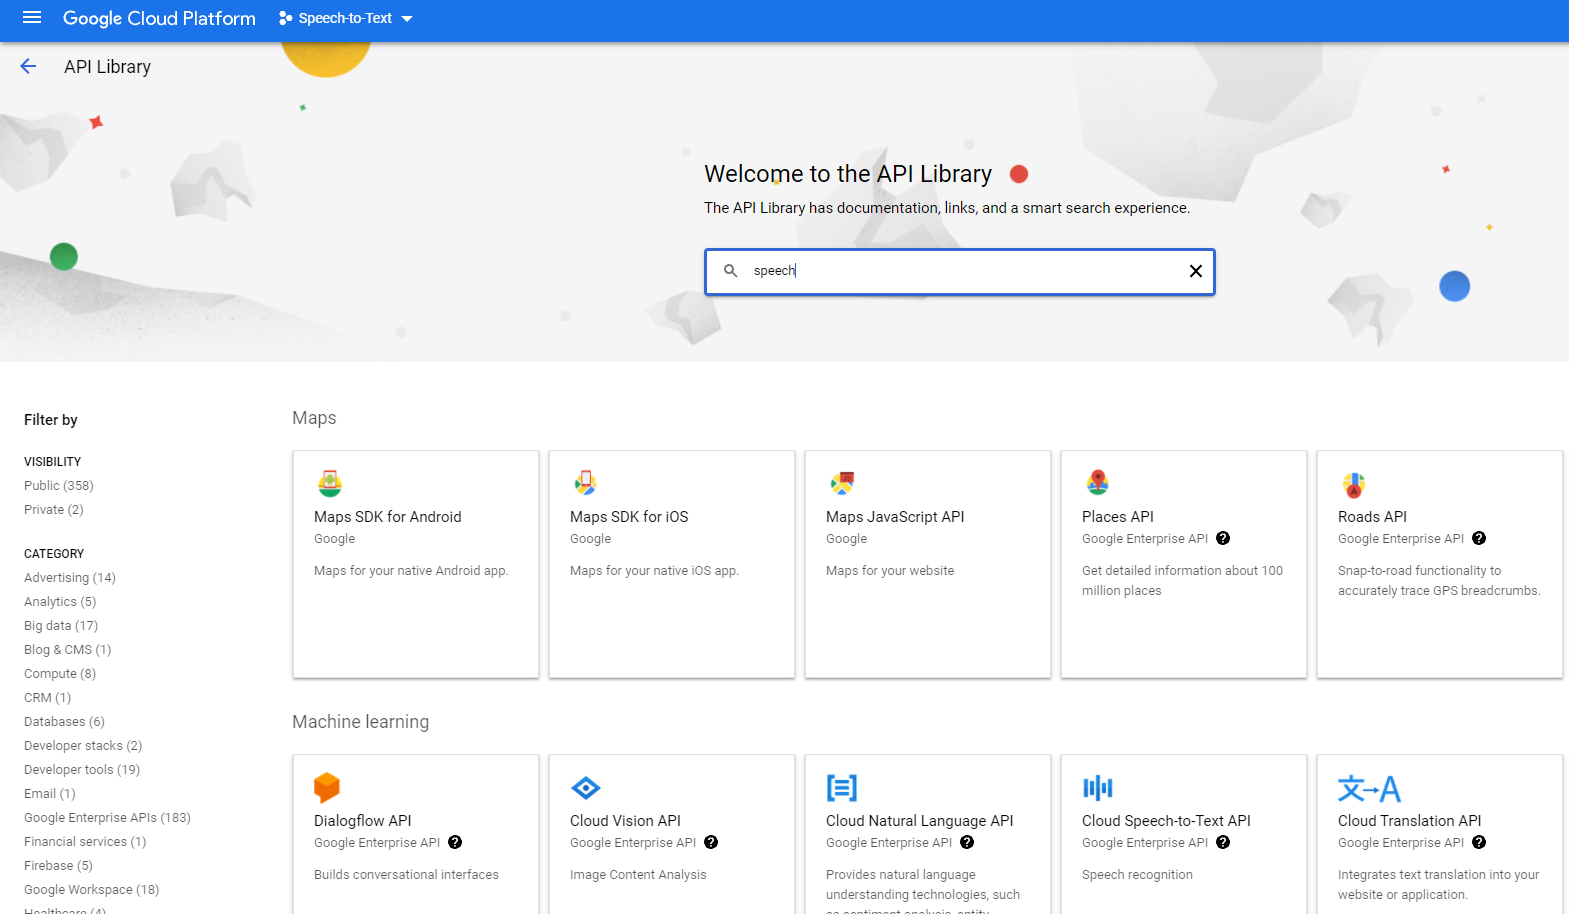
- Step 3: Afterwards search for Speech keyword
- Step 4: Select Cloud Speech to Text API from the list.
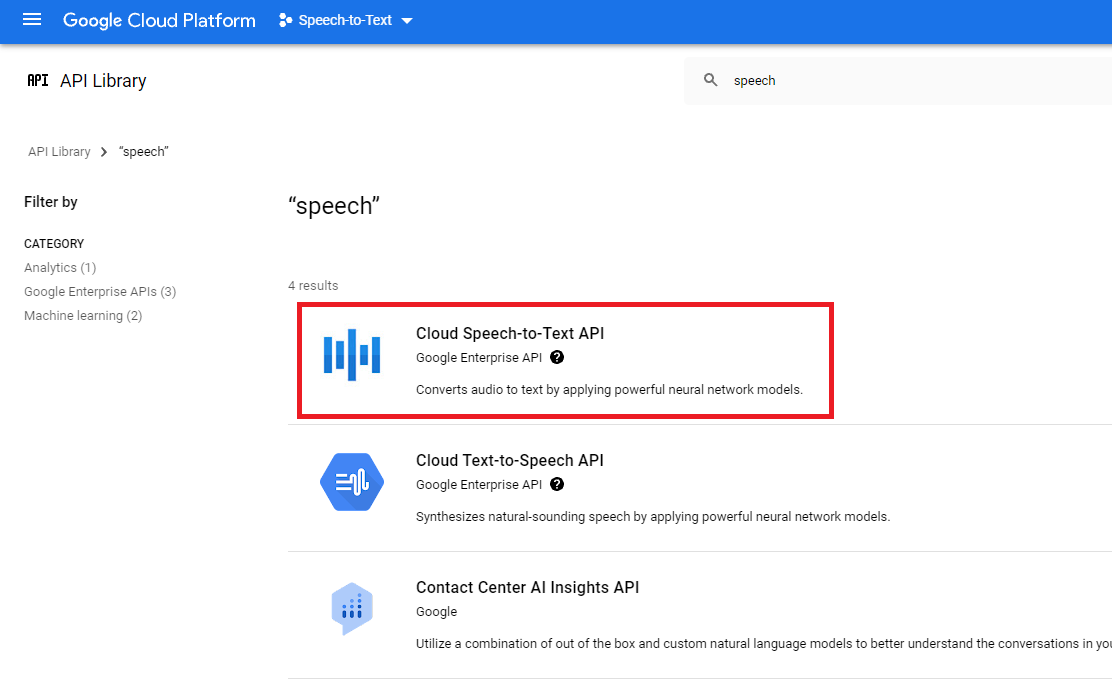
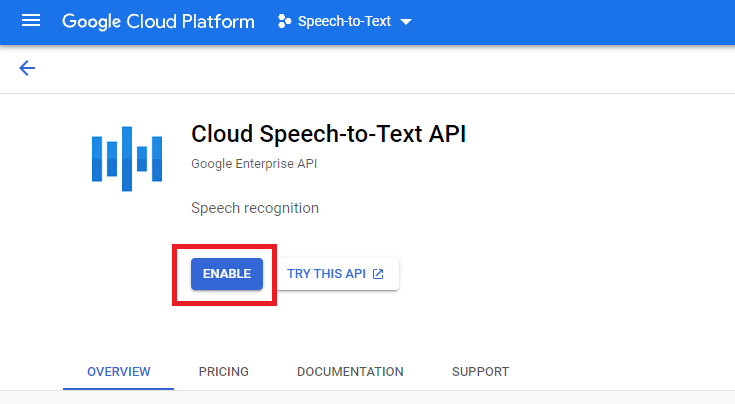
- Step 5: Enable Cloud Speech to Text API.
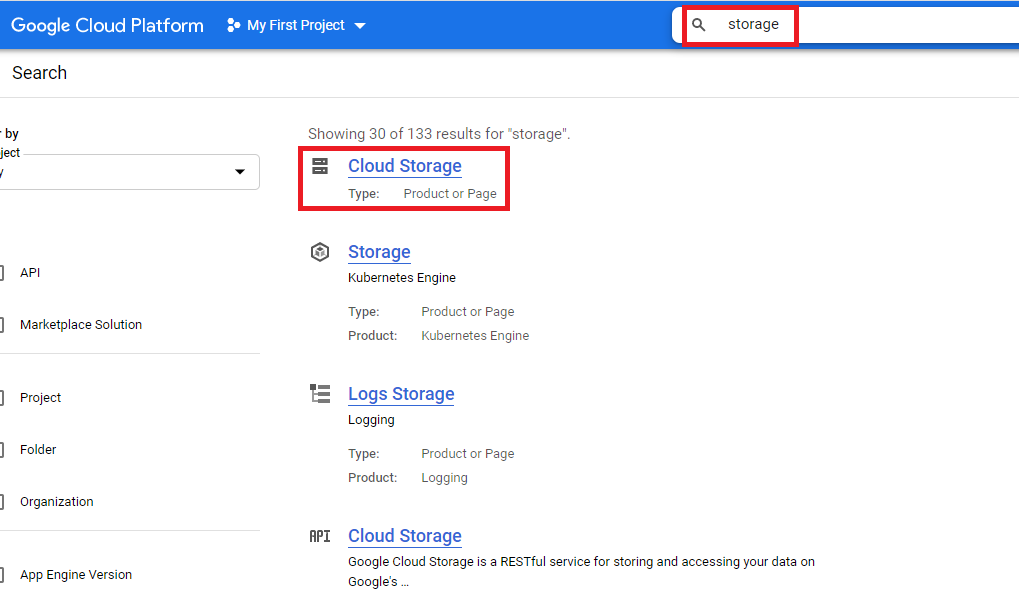
- Step 6: GCP uses its own storage solution for transcribing audio files, hence you will need to create a Storage first. Search for storage keyword
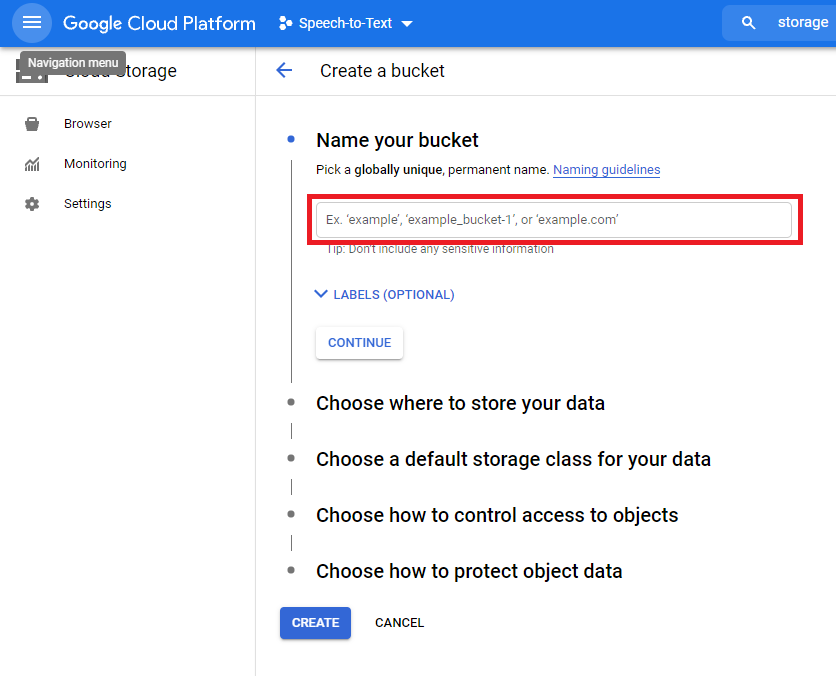
- Step 7: Within the Storage service click on Create Bucket

- Step 8: Provide unique bucket name. (it must be globally unique, hence you might want to add random digits/letters if needed)
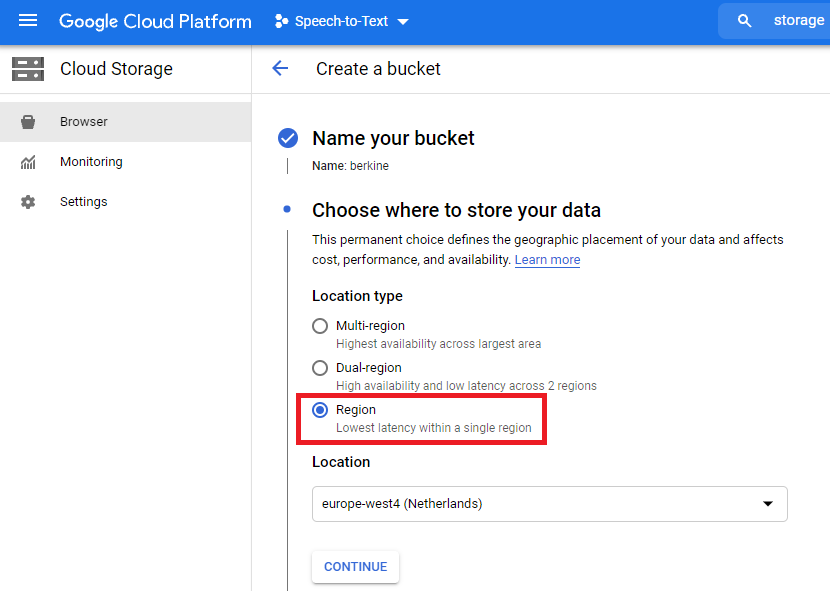
- Step 9: For the next step select Region
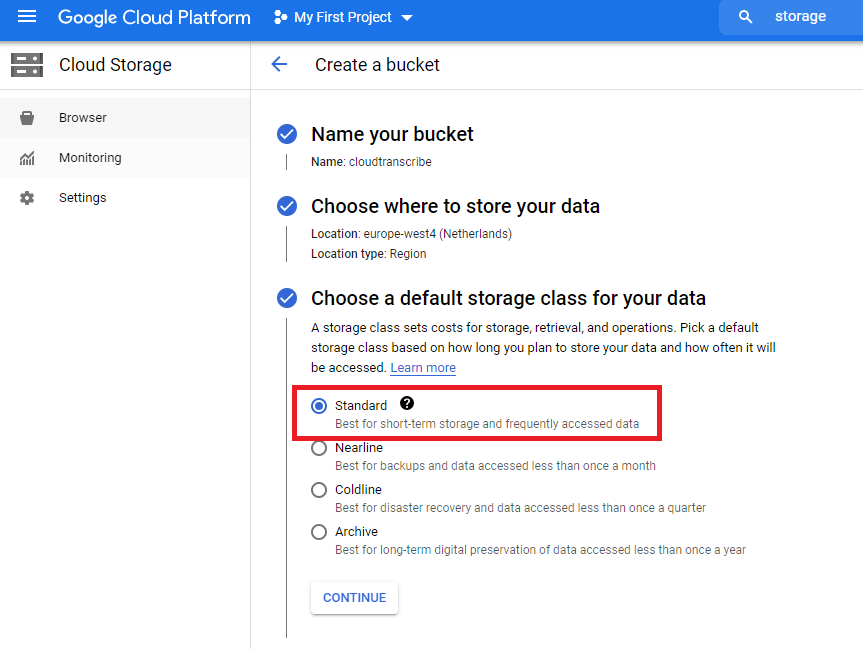
- Step 10: For the next step select Standard, or if you are familar with GCP storage types you can select alternate options as well as needed
- Step 11: Set versioning and encryption as needed or leave it with default values.

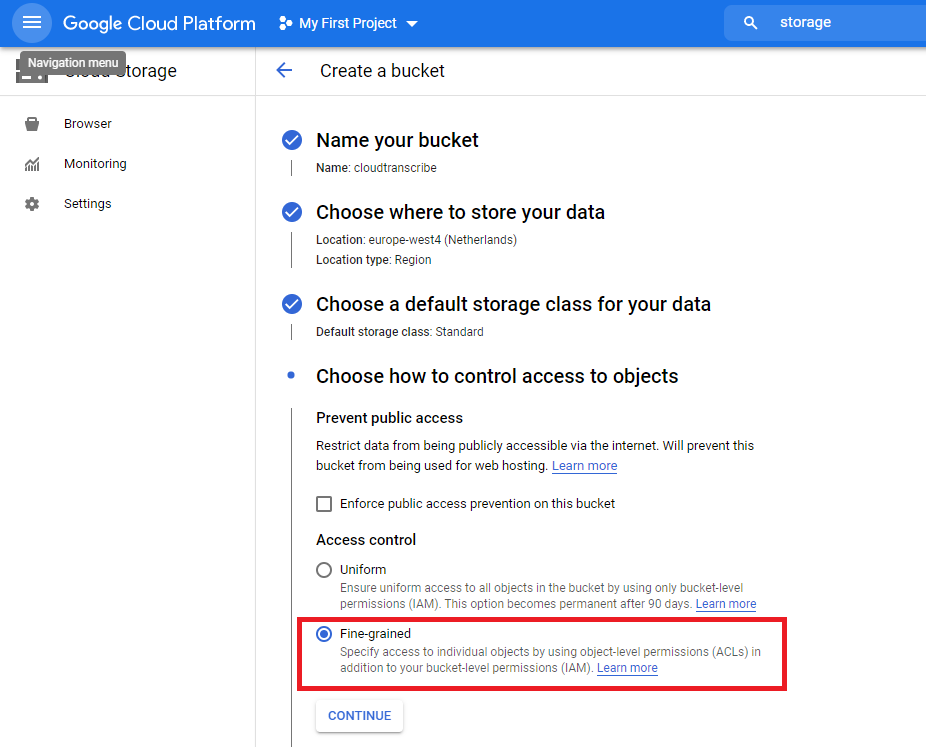
- Step 12: Select Fine Grained for access control.
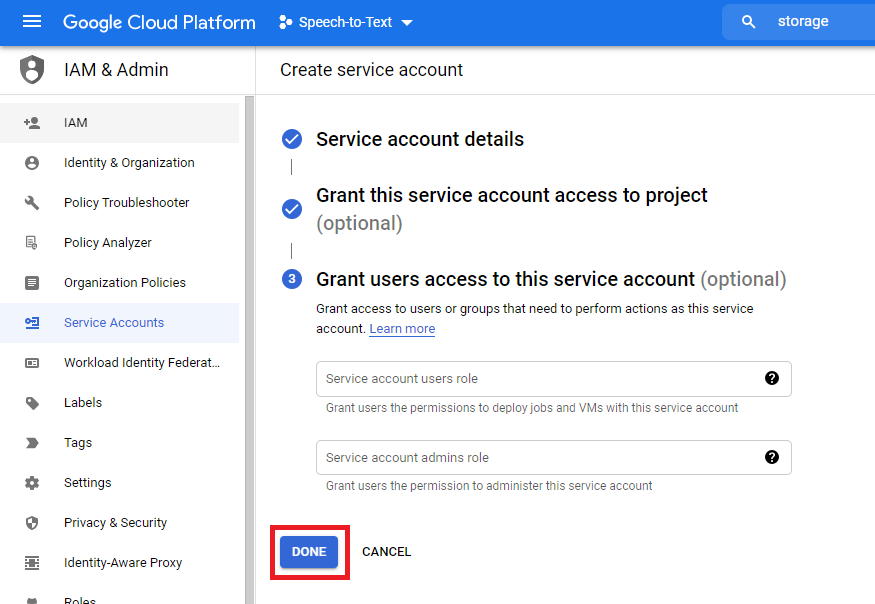
- Step 13: Now when your bucket is successfully created you need to provide access to that. For that we need to create a Role. Go to IAM & Admin and select Roles

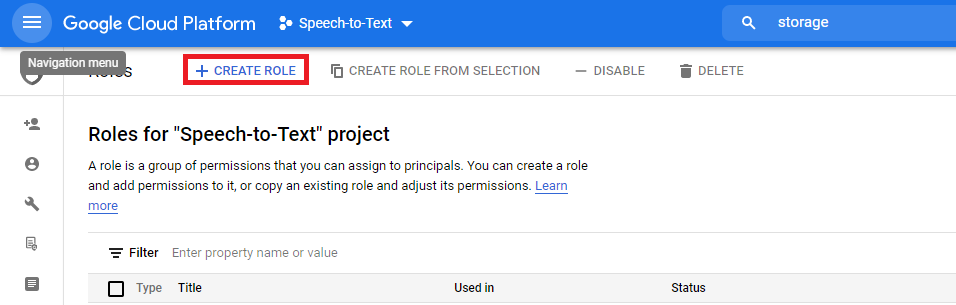
- Step 14: Click on Create Role
- Step 15: Provide a Role Title to be able to identify it later.
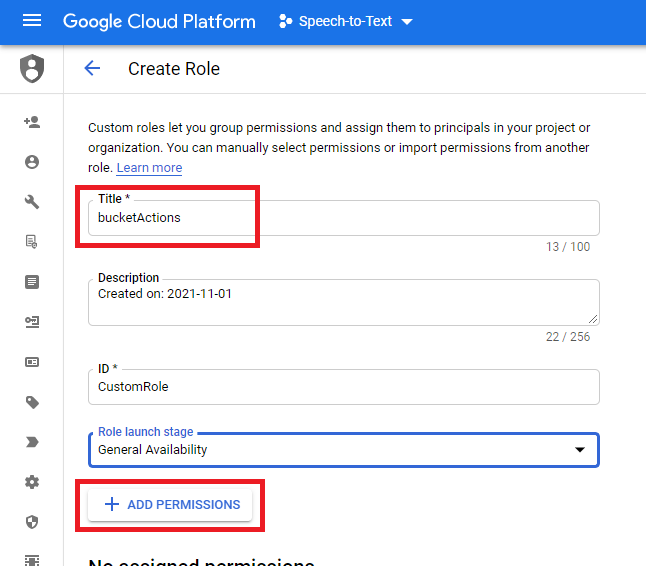
- Step 16: Click on Add Permissions.
- Step 17: Search by keyword storage and select storage.bucket.list.
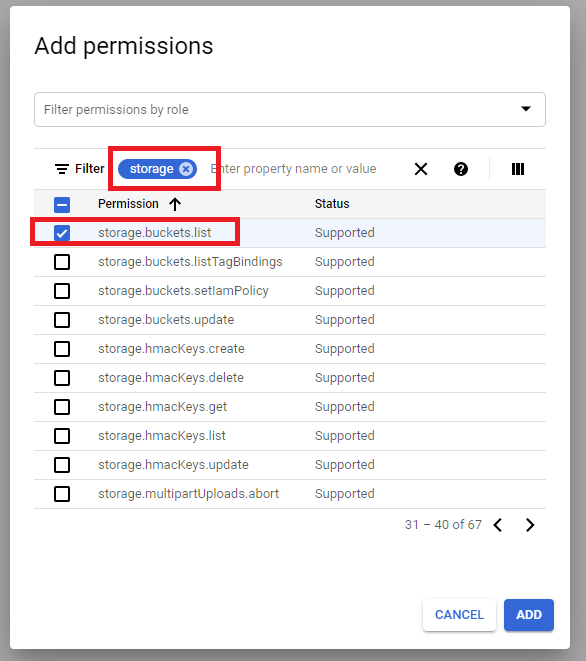
- Step 18: Also select following object level permissions as well as shown in the image.
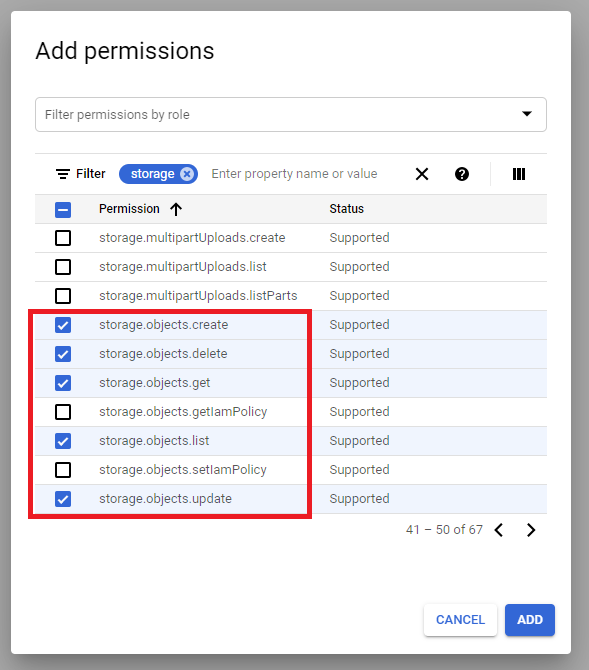

- Step 19: Final result should look like in the image and click Create.

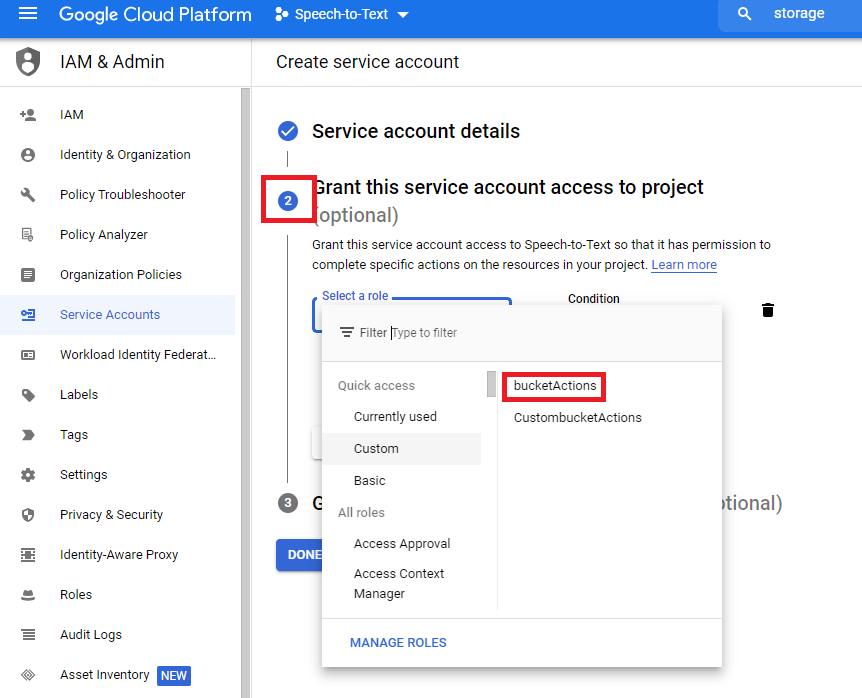
- Step 20: Now you need to create Create Service Credentials. Go to API & Credentials and click on Create Credentials
- Step 21: Click on + Create Credentials and select Service account from the list.
- Step 22: 1 - Provide Service account name and Service account description (optional).
- Step 23: 2 - Click on Select a Role and find your role that you created previously to access GCP Storage Bucket.
- Step 23: 3 - You can leave this step with defaults unless you want to add addtional user(s) and click Done.
- Step 24: Select your newly created Service Account, under Actions tab select Manage Keys.

- Step 9: Under Keys tab, select Add Key -> Create new key.
- Step 10: Select JSON as key type. Click Create, it will store in on your desktop.
- Step 11: Warning! Make sure you store this json file outside of your public folder, it must be stored in a secure place accessible only to you on your hosting server.
- Step 12: Include the path for the json in Admin Panel, under Transcribe Studio Settings. JSON file must be stored outside of your Public folder. Show full path for the JSON file including JSON filename. Here is an example for cPanel:
Both, GCP Text to Speech and Speech to Text Setup
How to Configure GCP for both Text to Speech and Speech to Text:
- Step 1: Go to the Google Cloud home page.
- Step 2: Click on the New Project button on the top left corner, and provide project name.
- Step 3: Afterwards search for Text to Speech keyword, and select Cloud Text to Speech API from the list.
- Step 4: Enable Cloud Text to Speech API.
- Step 3: Afterwards search for Speech keyword
- Step 4: Select Cloud Speech to Text API from the list.
- Step 5: Enable Cloud Speech to Text API.
- Step 6: GCP uses its own storage solution for transcribing audio files, hence you will need to create a Storage first. Search for storage keyword
- Step 7: Within the Storage service click on Create Bucket
- Step 8: Provide unique bucket name. (it must be globally unique, hence you might want to add random digits/letters if needed)
- Step 9: For the next step select Region
- Step 10: For the next step select Standard, or if you are familar with GCP storage types you can select alternate options as well as needed
- Step 11: Set versioning and encryption as needed or leave it with default values.
- Step 12: Select Fine Grained for access control.
- Step 13: Now when your bucket is successfully created you need to provide access to that. For that we need to create a Role. Go to IAM & Admin and select Roles
- Step 14: Click on Create Role
- Step 15: Provide a Role Title to be able to identify it later.
- Step 16: Click on Add Permissions.
- Step 17: Search by keyword storage and select storage.bucket.list.
- Step 18: Also select following object level permissions as well as shown in the image.
- Step 19: Final result should look like in the image and click Create.
- Step 20: Now you need to create Create Service Credentials. Go to API & Credentials and click on Create Credentials
- Step 21: Click on + Create Credentials and select Service account from the list.
- Step 22: 1 - Provide Service account name and Service account description (optional).
- Step 23: 2 - Click on Select a Role and find your role that you created previously to access GCP Storage Bucket.
- Step 23: 3 - You can leave this step with defaults unless you want to add addtional user(s) and click Done.
- Step 24: Select your newly created Service Account, under Actions tab select Manage Keys.
- Step 9: Under Keys tab, select Add Key -> Create new key.
- Step 10: Select JSON as key type. Click Create, it will store in on your desktop.
- Step 11: Warning! Make sure you store this json file outside of your public folder, it must be stored in a secure place accessible only to you on your hosting server.
- Step 12: Include the path for the json in Admin Panel, under Voiceover Studio Settings and Transcribe Studio Settings, also make sure to include GCP Bucket under Transcribe Studio Settings. JSON file must be stored outside of your Public folder. Show full path for the JSON file including JSON filename. Here is an example for cPanel:
IBM Account Creation
Getting started with IBM Cloud.
Note: When you open a IBM Cloud account, they provide you 200$ of credits that is valid for 1 month.
How to Create IBM Cloud Account:
- Step 1: Go to the IBM Cloud home page.
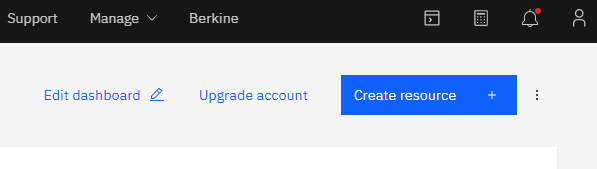
- Step 2: After registration, click on the Create Resource button.
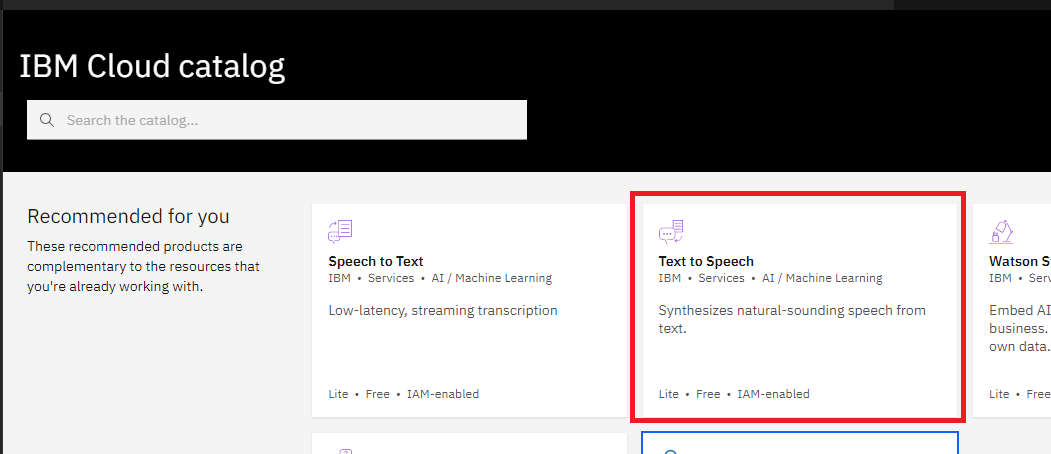
- Step 3: Select Text to Speech.
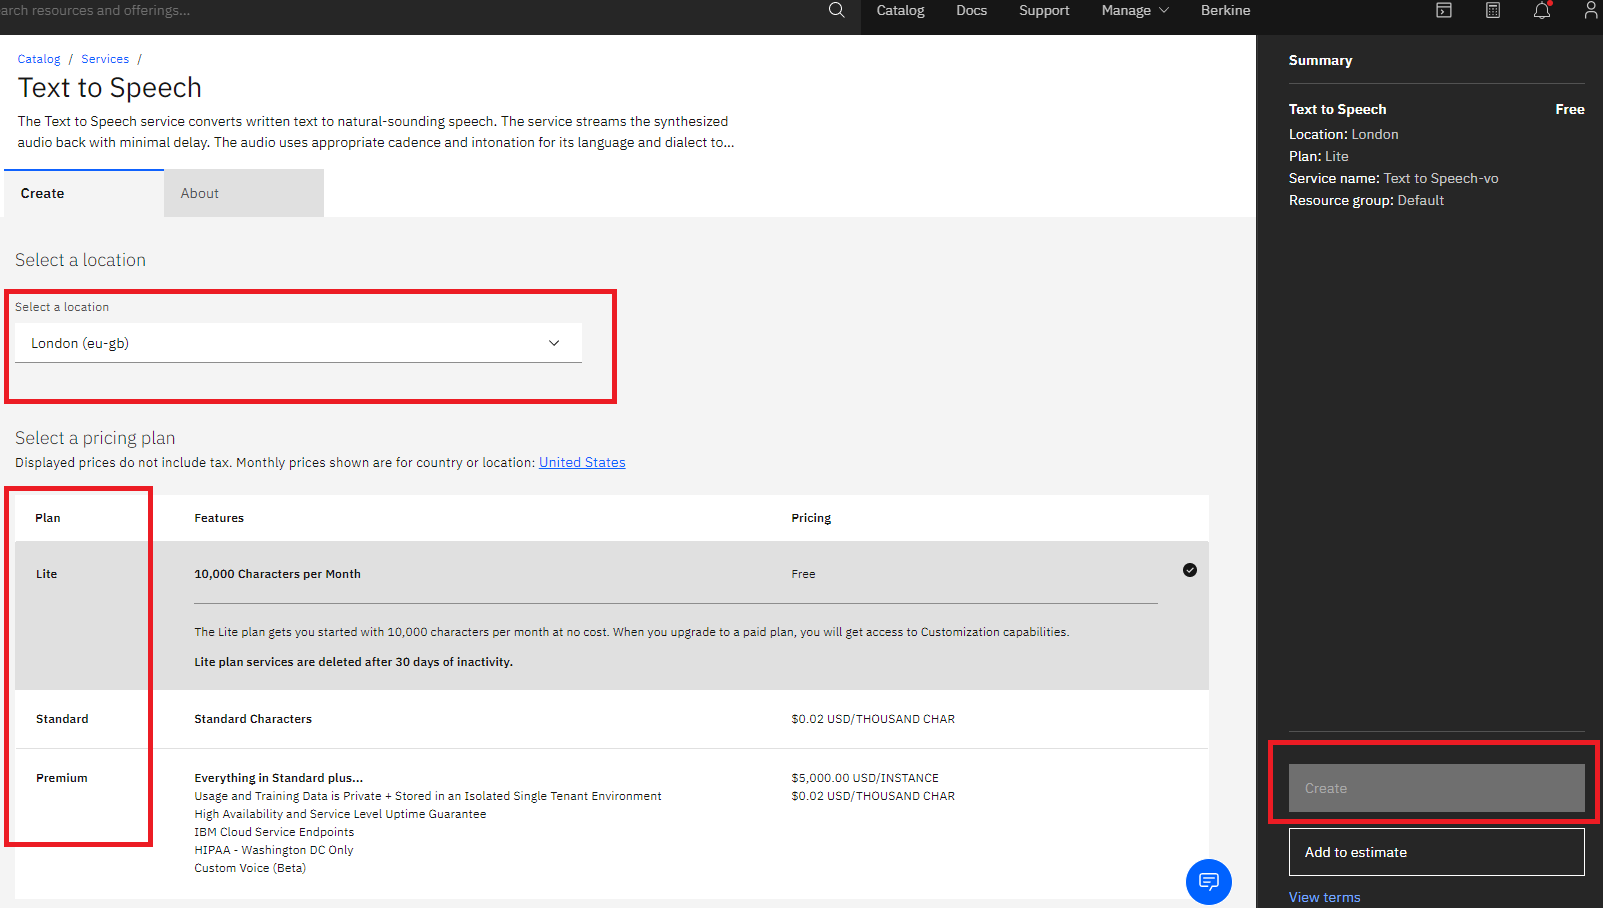
- Step 4: Select IBM region and your desired plan, also resource name and click Create button.
- Step 5: On the next step, click on your newly created resource name and copy your API Key and URL.
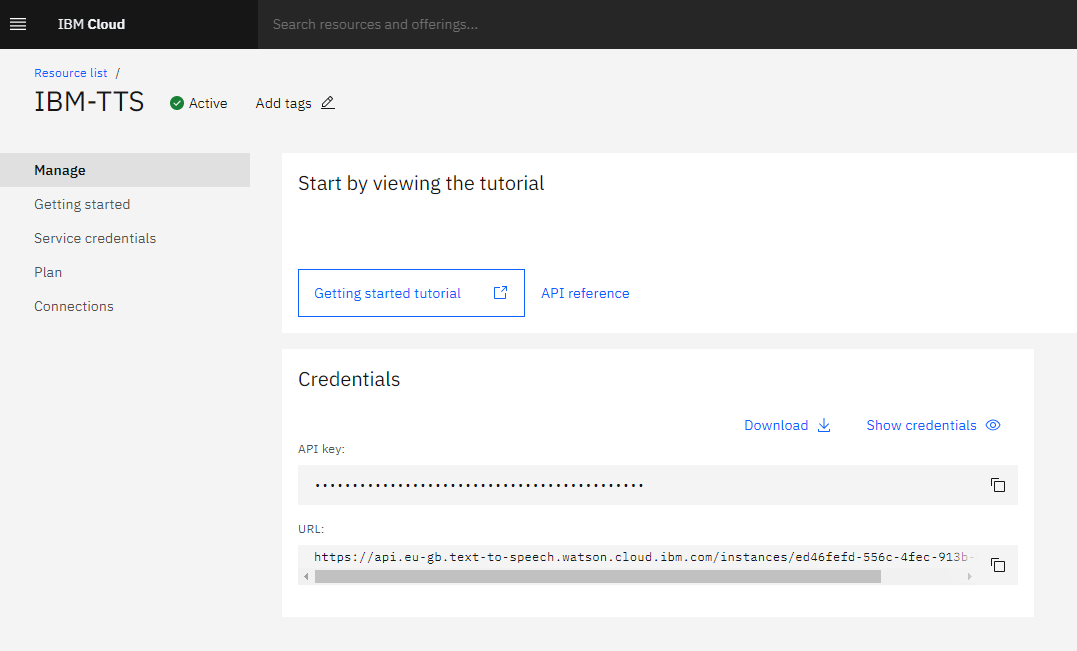
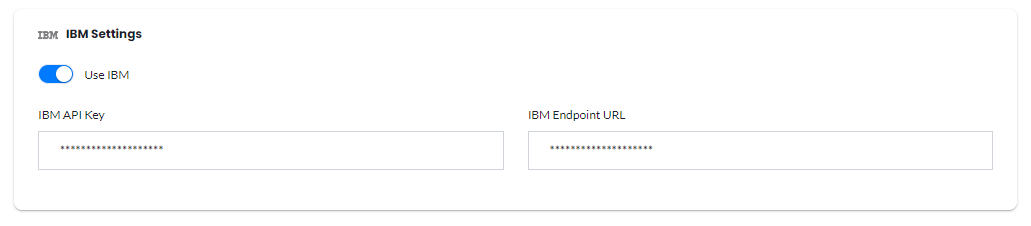
- Step 6: Include both in Admin Panel under Voiceover Studio Settings.
Configure Wasabi Storage
Getting started with Wasabi Storage.
Apart from Local Server Storage, and Amazon S3 bucket, you can also use Wasabi Storage as your default storage for the synthesized text results.
How to Configure Wasabi Storage:
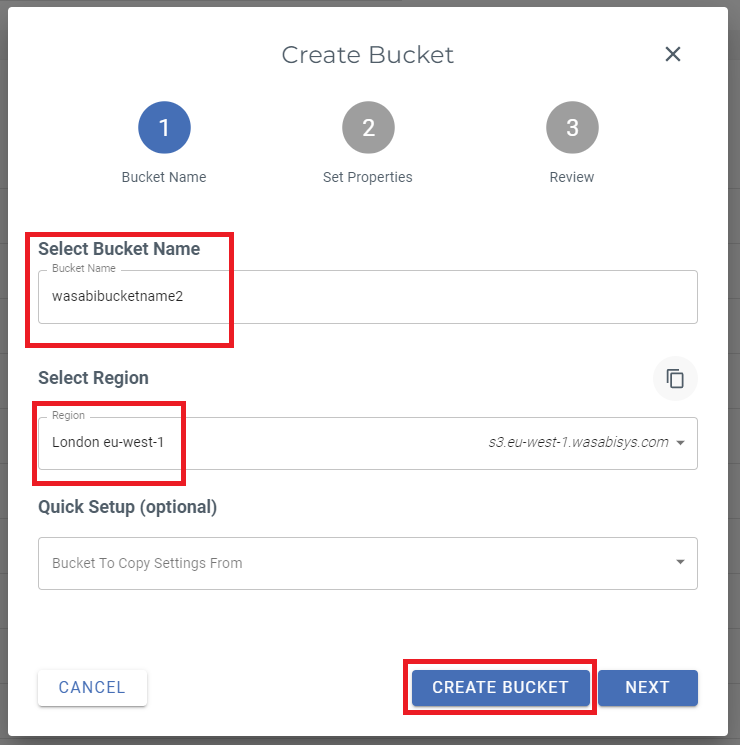
- Step 1: Login to your Wasabi Account, select Buckets under Data Access menu panel and click Create Bukcet

. - Step 2: Prorive a unique Bucket Name and select your Region and click Create Bucket. Make a note of both them, you will be including them into the script at the last step.
- Step 3: After the bucket is created, select your bucket from the list and under Actions tab, click on Settings.
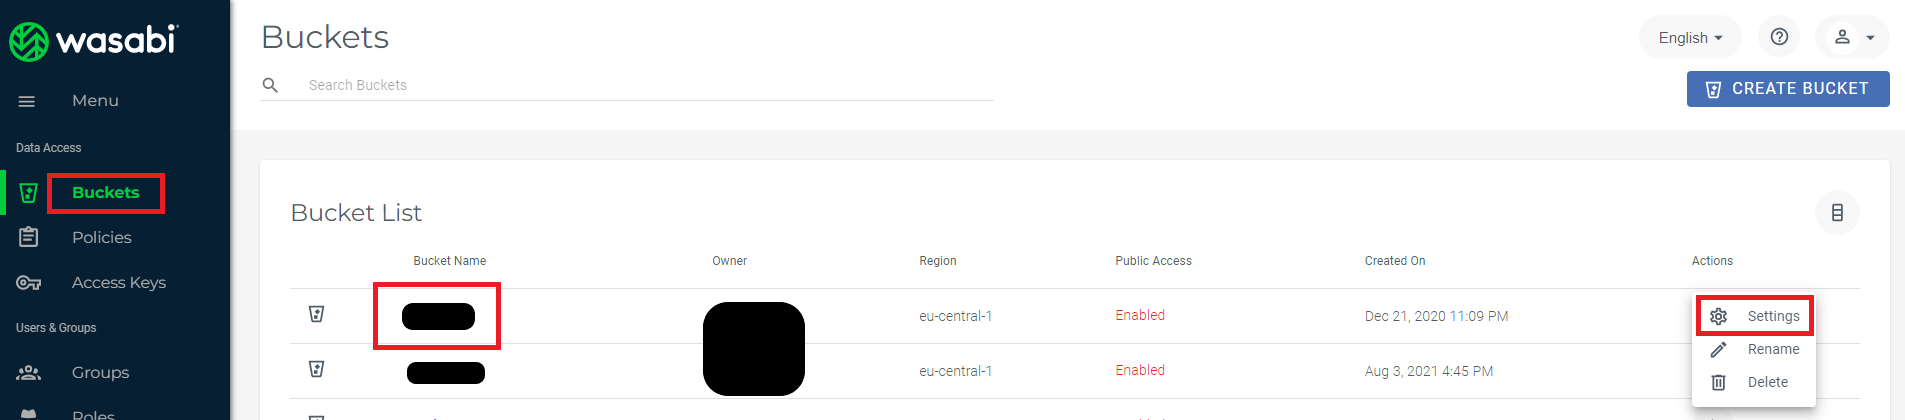
- Step 4: In the Settings page, make sure you Enable Public Access for this bucket.

- Step 5: Now when you are done creating and configuring your Wasabi Bucket, you will need to create Access Keys to be able to use your Wasabi Account.
- Step 6: Go to Access Keys under Data Access menu panel and click on Create New Access Key.
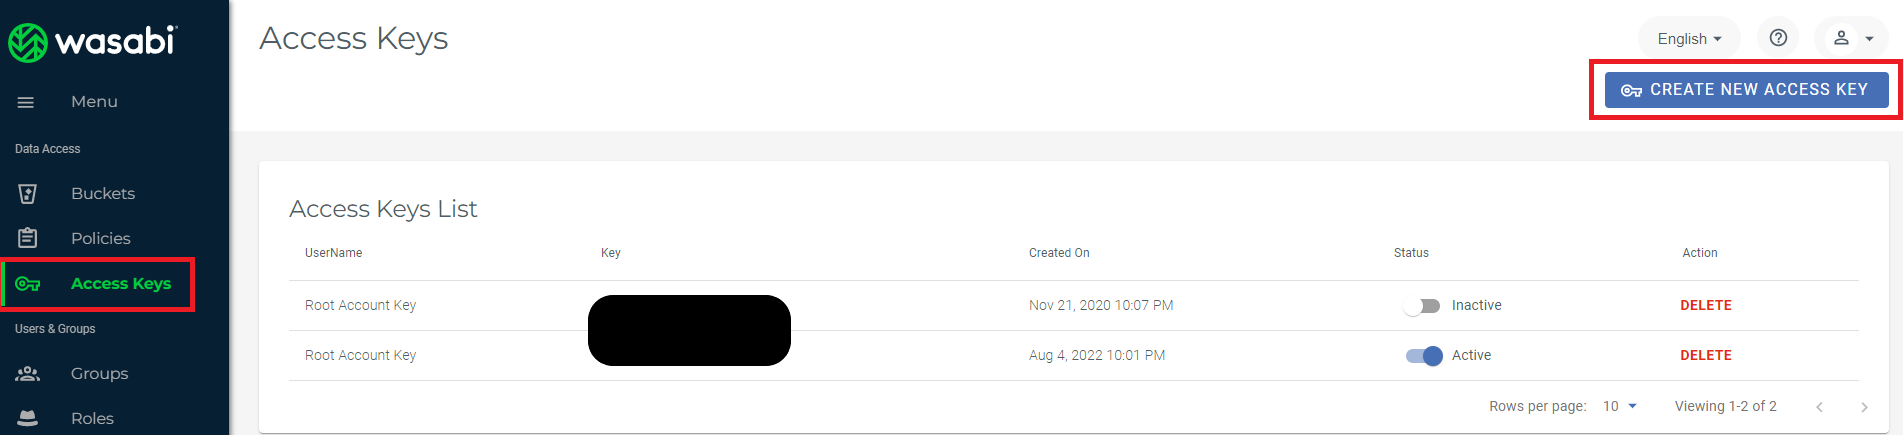
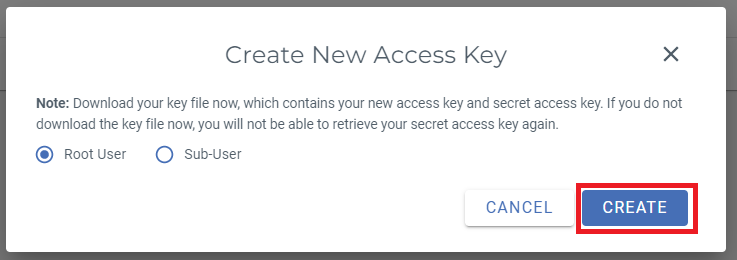
- Step 7: Click Create button and download or copy your keys immediate as you get to see your Secret Access key only once.
- Step 6: Enter your Wasabi Access Keys, Wasabi Bucket and Wasabi Bucket Region in the Admin Panel of the script.

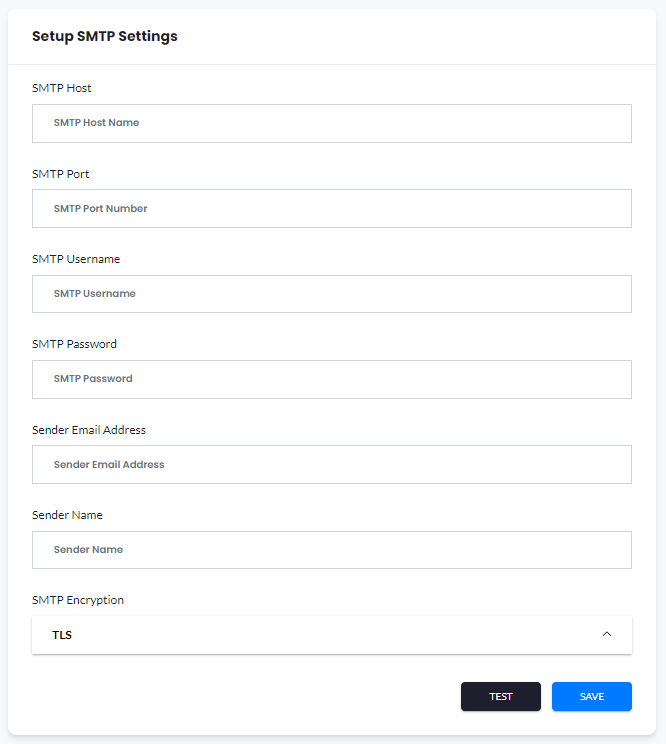
SMTP Configuration
For sending all emails, such as email verification, support ticket creation etc, SMTP needs to be configured.
All the SMTP settings can be configured and set in Admin Panel under General Settings -> SMTP Settings.
Required SMTP Settings:
- SMTP Host
- SMTP Port
- SMTP Encryption
- SMTP EMail Login (Username)
- SMTP EMail Password
- SMTP Sender Email Address
- SMTP Sender Name
Include Required SMTP Settings and click Save Changes button:
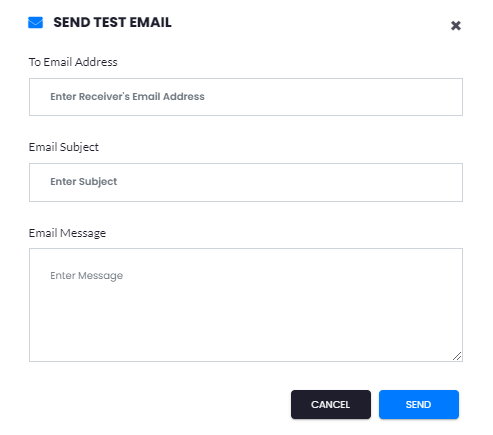
You can also test your SMTP Settings immediately via Test button:
If you are planning to use Gmail for sending emails:
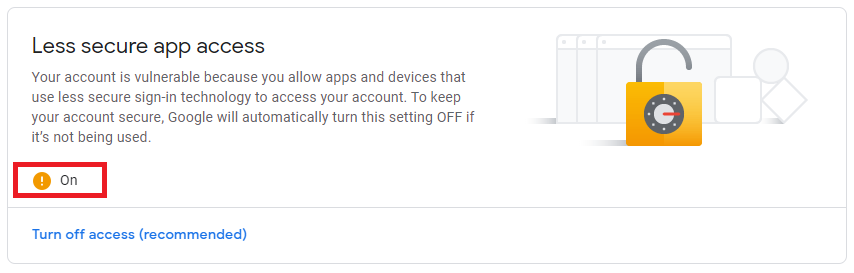
In your Gmail Account settings, under Security tab, make sure your Less secure app access feature is turned on.

Google Analytics Configuration
Analyze in-depth detail about the visitors on your main frontend page.
Setup Google Analytics:
- Step 1: Visit Google Analytics page.
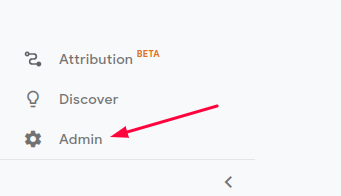
- Step 2: On the left menu select Admin.
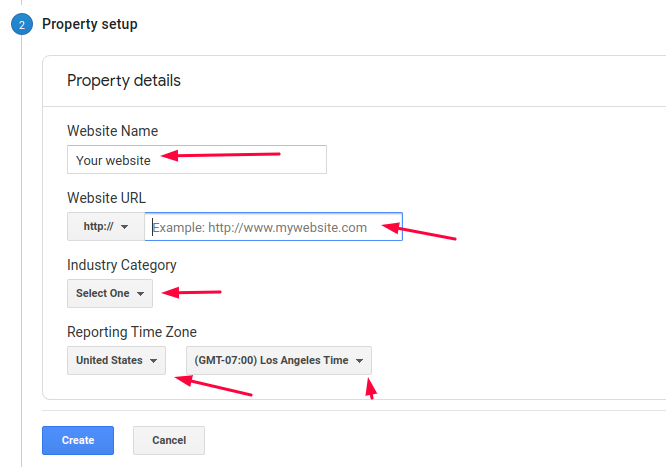
- Step 3: Click Create Property, **select Web and then Continue.**.


- Step 4: After that it will appear screen with information for your website.
- Step 5: Fill it and then click Create.
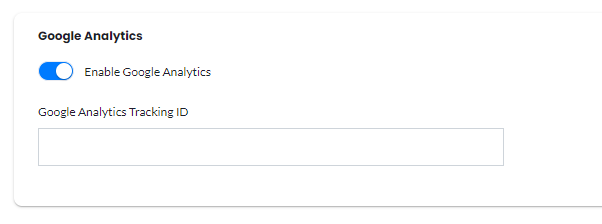
- Step 6: Include Tracking ID into Google Analytics Tracking ID field in Admin Panel under General Settings -> Global Settings -> Google Analytics, and don't forget to enable the Google Analytics checkbox and click Save button.
Google Maps Configuration
To use the Maps JavaScript you must have an API key. The API key is a unique identifier that is used to authenticate requests associated with your project for usage and billing purposes.
To Get a Maps API Key:
- Step 1: Go to the Google API Console
- Step 2: Click the project drop-down and select or create project for which you want to add an API key and give it a project name.
- Step 3: If you are using Google API for the first time you will see this screen after creating the project:

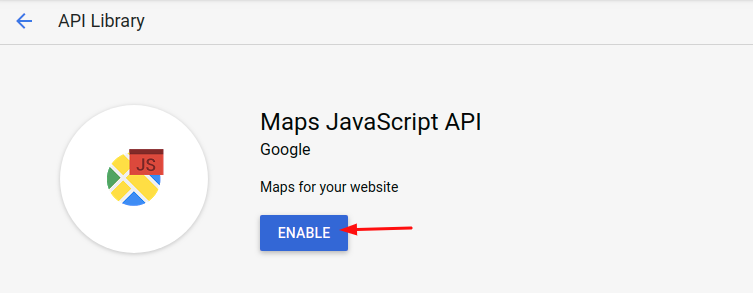
- Step 4: Click Enable Apis and Services button or select Library button on the left.
- Step 5: Find Maps JavaScript API and enable it as shown below.
- Step 6: Click the menu button and select Credentials and click Create credentials > API key.
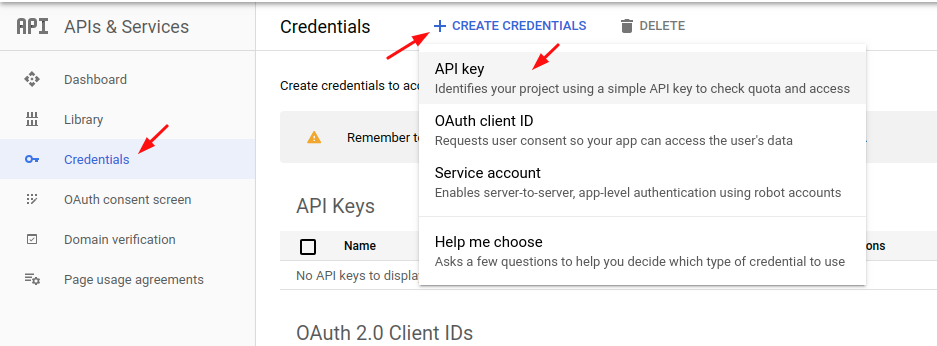
- Step 7: The API key created dialog displays your newly created API key. Copy and paste it as shown in Step 8. The new API key is listed on the Credentials page under API keys.

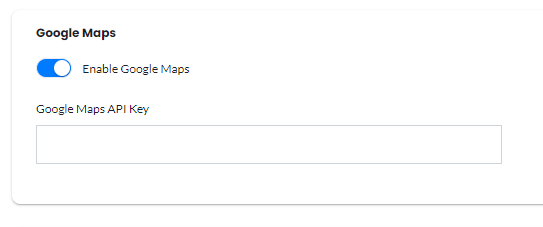
Important: Remember to restrict the API key before using it in production. - Step 8: Include the API key in Admin Panel under General Settings -> Global Settings -> Google Maps, and don't forget to enable the Google Maps checkbox and click Save button.
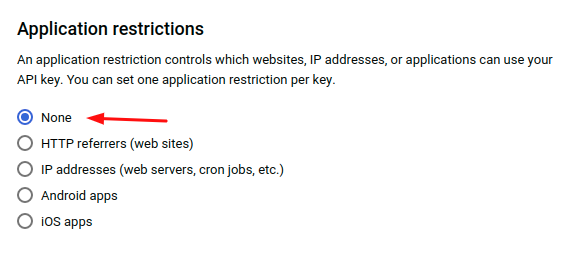
Change application restrictions:
Depending on your server/domain configuration the script maybe won't accept the HTTP referrers restrictions so try with changing the application restrictions back to None
Enable Billing on your project:
Sometimes after adding the key these features maybe won't work again. Then depending on the google account associated with the project created and maybe you will need to enable Billing.
Learn more here about it: Billing or here Getting started with Google Maps Platform
Google reCaptcha v3 Configuration
To avoid spams, all contact and registration forms have Google reCaptcha v3 enabled. It is optional feature, but strongly recommended.
To use this feature, you will need to have reCaptcha Site Key and reCaptcha Secret Key.
To Get a Google reCaptcha v3 Keys:
- Step 1: Go to the Google reCaptcha Console
- Step 2: Enter Label to identify your reCaptcha keys.
- Step 3: For reCaptcha Type, select "reCAPTCHA v3":
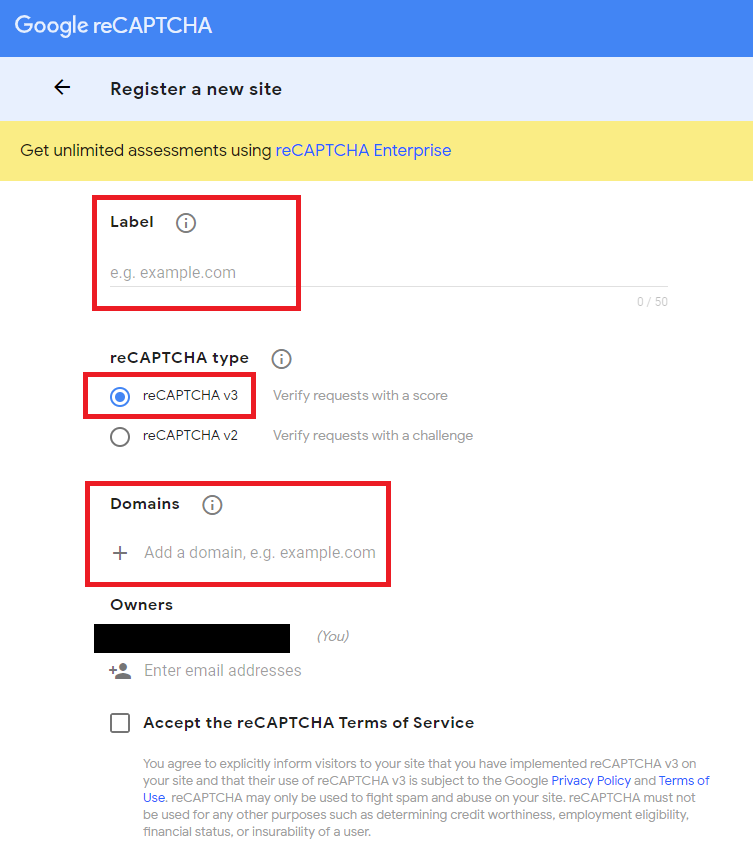
- Step 4: Enter your domain name.
- Step 5: Accept the reCAPTCHA Terms of Service
- Step 6: Click the "Submit" button.
- Step 7: Copy both "Site Key" and "Secret Key".
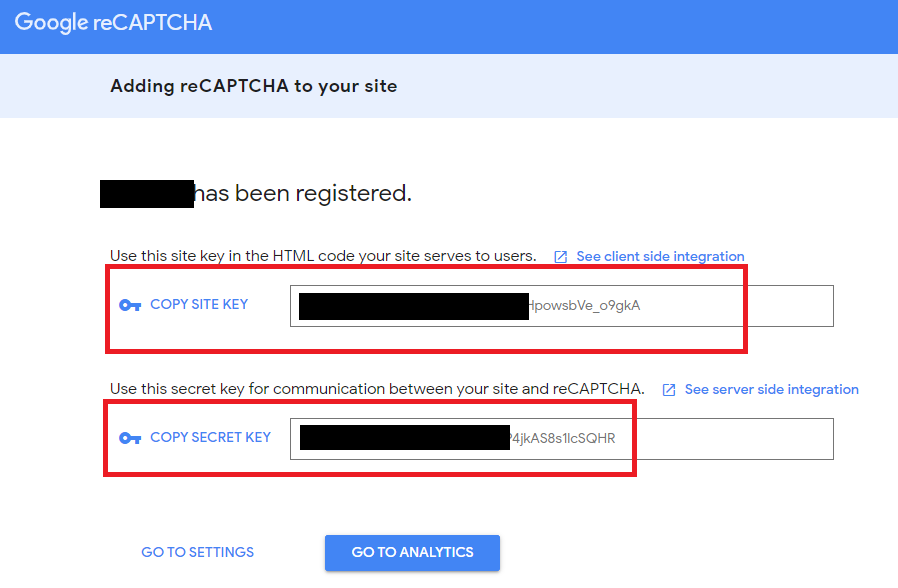
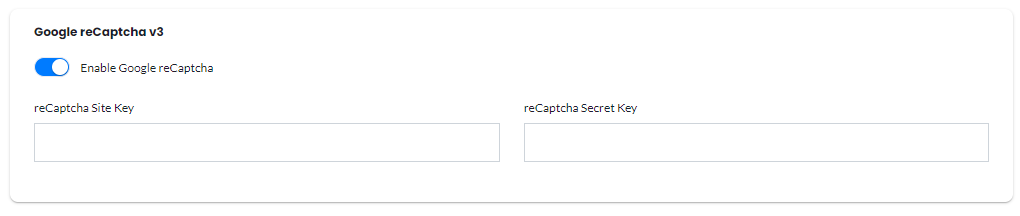
- Step 8: Include the API keys in Admin Panel under General Settings -> Global Settings -> Google reCaptcha, and don't forget to enable the Google reCaptcha checkbox and click Save button.
How to Customize Frontend
All frontend pagename.blade.php files consist of standard HTML + CSS Bootstrap structure. So it is easy to edit.
Warning: If you are planning to add heavy css customization, it would be better to create a separate css file and keep intact upon each update, otherwise next update might rewrite all previously made changes.
How to customize frontend:
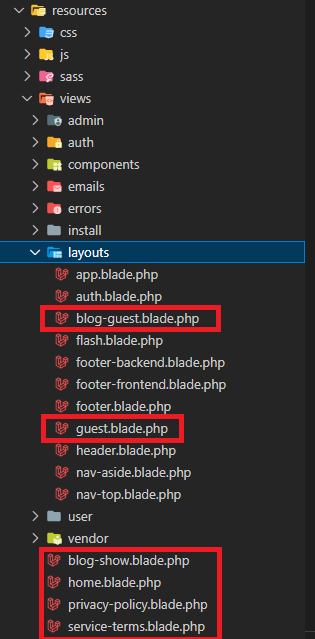
- Step 1: All files that are used as frontend pages or for frontend can be found under resources/views and couple files under resources/views/layouts directories as shown in the picture.
- Step 2: For frontend styling we used SaSS, they can be found under resources/sass/frontend directory. If you plan to use sass files for customization don't forget to compile your sass files first to apply the effects. Otherwise, you can add custom css files into guest.blade.php below line 23. (With version 1.0.2 you will be able add directly via admin panel)
- Step 3: All pages are stored direcly under resources/views directory and named accordingly. You can edit the text in any of these files as you prefer.
- Step 4: If you want to add new page, make sure it has the same @extends and @section parts as in other pages.
Translate to other Languages
Cloud Polly by default is written in English Language, we also included as an example support for Spanish language, translated by Google Translate (Warning! Quality of these translations might not be the best).
You can translate or add any language as you prefer.
How to Translate:
- Step 1: Go to "Lang" folder in the root directory.
- Step 2: Copy "en.json" to your desired language code. Ex: "ru.json"
- Step 3: Translate only the value part, and make sure they stay within double quotes with comma at the end except the last value.
- Step 4: Save your file in the same "Lang" folder.
- Step 5: Go to "Config" -> "local.php" file.
- Step 6: Add your new language code with proper fields: 'code', 'display', 'flag'.
'ru' => [
    'code' => 'RU',
    'display' => 'Русский',
    'flag' => 'ru'
],
CRON Job Configuration
The software requires cron jobs to be set up in order to automate some of its functions, such as checking the status of the accounts, pull transcribe studio resuts as well as additional storage clean-ups.
How to create CRON job:
- Step 1: Open terminal in your hosting platform or if you are using cPanel, copy and paste the Step 3 in your Cron Jobs tab.
- Step 2: Run crontab -e command
crontab -e
* * * * * /usr/local/bin/php /home/YOURDOMAINPATH/artisan schedule:run
crontab -l
Manual Activation
If after successfully installation you see a message that your script is not activated for whatever reason upon login, try reactivating manually. IP change might affect your license activation status as your activation code is registered with your domain name and IP address.
Steps for Manual Activation:
- Step 1: In your browser Go to: YOURDOMAINNAME/admin/settings/activation/manual
- Step 2: Enter your Envato Username (case sensitive) and your Activation Code that you got from your Codecanyon account upon downloading the script
- Step 3: Click Save, it will generate a new license file, and you should be all set
Initial Release v1.0
Released on 2nd December, 2022